Manual for the Bottle Sanitizer – Bottle Washer
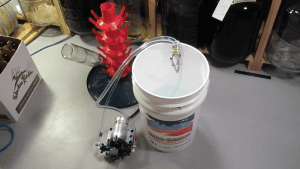
The Pressurized Bottle Washer / Sanitizer / Transfer Pump is designed to simplify bottle sanitizing for winemakers. It comes ready to attach to a bucket, though the bucket and optional filter are not included. Operating at 45 PSI with a flow rate of 3.3 gallons per minute, this system makes bottle cleaning incredibly efficient.
Now, you can clean your bottles using any sanitizing solution of your choice. In fact, it takes just seconds to fully sanitize a bottle! Moreover, the system includes a screen on the intake hose to protect the pump from debris in the sanitizing solution. Not only is this system portable, but it also conveniently stores back into the bucket for easy storage. Ultimately, the Pressurized Bottle Washer / Sanitizer / Transfer Pump saves time and effort, making it an invaluable tool for any winemaker.
What’s Included?
- Pump with built-in pressure switch
- Washer Hose (Red) with attached Bottle Washer Head
- Return Hose (Blue) with screen attached
- Zip ties
- Paper template for drilling holes
- Add-on: Screw-on inlet screen strainer for large transfers
- Additional hoses available for purchase here.
What You’ll Need for Assembly
To assemble the Bottle Washer system, you’ll need the following tools and materials:
- A 5-gallon (or larger) plastic bucket (preferably food grade)
- Drill
- Drill bit: 3/16” to 1/4″
- Optional drill bit: 3/32” (for pilot holes)
- Marker
- Ruler (optional)
- Wire cutters (optional)
- GFI adapter or dedicated GFI outlet
Instructions for Assembly
1. Drill Holes in the Bucket
The first step is to drill holes in the bucket for securing the Bottle Washer Head.
- Secure the Bottle Washer Head to the bucket using the provided zip ties. If you don’t have the provided template, you can easily create one yourself. Since zip ties are flexible, exact measurements aren’t necessary.
- Begin by marking the positions for four holes, forming a rectangle. The rectangle should measure 1 inch across and 2 inches high.
- Use the template and a marker to outline the positions of the four holes. Ensure that the topmost hole is approximately 1.5 inches below the bucket’s top rim.
- Additionally, avoid drilling into the reinforcing rims below the top edge. If your bucket has a handle, make sure the holes are not near the handle attachment points.
- Hold the Bottle Washer Head up to the marked holes to double-check the spacing inside and outside the bucket.
- Drill the holes using a 3/16” or 1/4″ drill bit. To ensure precision, you can use a 3/32” drill bit for pilot holes before using the larger bit.
2. Attach Hoses to the Pump
Next, attach the provided hoses to the pump:
- Attach the Washer Hose (Red) to the pump outlet port (Red).
- Attach the Return Hose (Blue) to the pump inlet port (Blue).
Important Note: The hose connections include “wings” on the nuts for easy tightening. Tighten these connections to finger-tight only. Using tools may damage the wings.
3. Attach the Bottle Washer Head to the Bucket
Finally, secure the Bottle Washer Head to the bucket:
- Insert a zip tie into one of the top holes from outside the bucket, with the ribs of the zip tie facing the opposing hole.
- Hold the Bottle Washer Head against the inside of the bucket so that the zip tie aligns with the threads of the connector that links the head to the hose. Thread the zip tie through the opposite top hole and through its locking head, but do not tighten yet.
- Repeat the process for the bottom holes. The zip tie should sit below the arm of the Bottle Washer Head, where the metal discharge tube meets the main body. Again, thread the zip tie through the bottom holes but leave it loose for now.
- Confirm that the Bottle Washer Head is positioned correctly and aligns with the zip ties. Once everything is in place, tighten the zip ties securely.
- Trim the loose ends of the zip ties using wire cutters or heavy-duty scissors for a clean finish.
Optional Add-Ons
For larger transfers, you can purchase a screw-on inlet screen strainer. Additionally, extra hoses are available for purchase here.